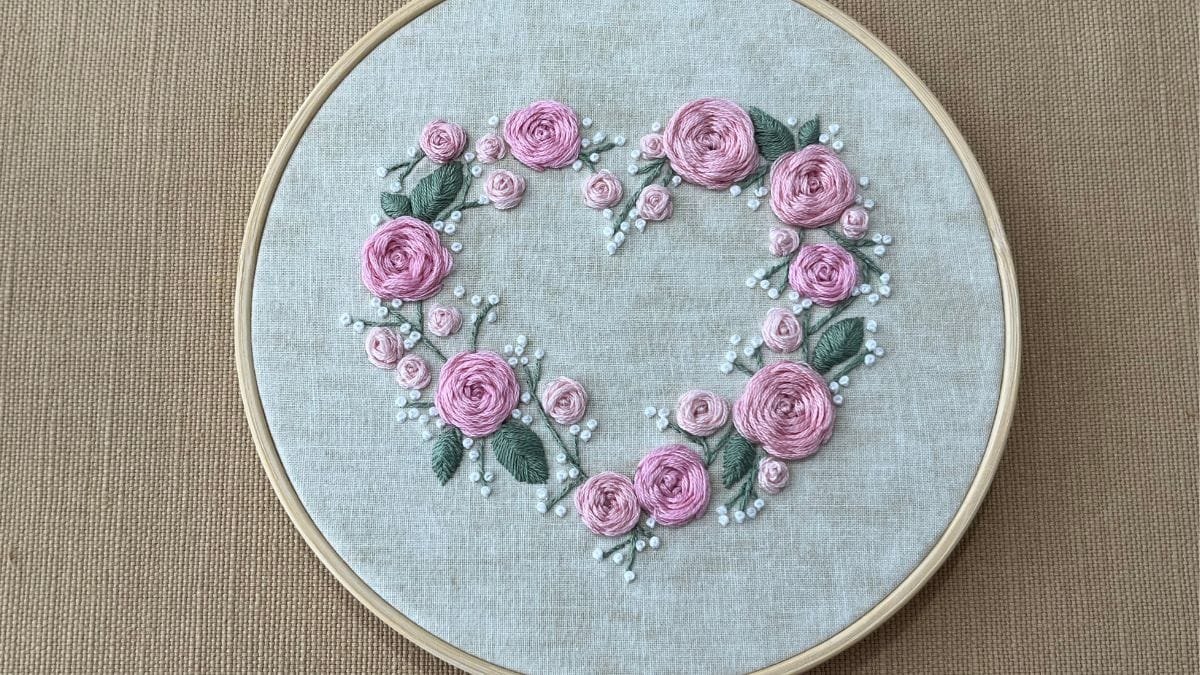
It’s been a very cold and snowy week here in upstate New York. I’ve spent a lot of time inside working on this woven rose heart embroidery pattern, just in time for Valentine’s Day. I wanted to give you something fun and creative to stitch during the winter season. Even though it feels perfect for Valentine’s Day, I also think it works all year round. Flowers and hearts are always a good idea, no matter the season.
The photo of the finished embroidery looks a little different from the pattern I’m sharing today. I made a few small changes after stitching the sample. My plan was to stitch it again with those changes and take new photos. But I realized I was trying to do too much at once. Instead of waiting for everything to be perfect, I decided to share what I have finished so far. That way, you can start stitching right away.
Sometimes it’s better to move forward with what you have than to get stuck trying to make everything perfect. I hope this pattern brings you some calm and creativity, especially if you’re spending more time indoors during the colder months.
Embroidery Stitch Tutorial
In the YouTube video for this project, I show the four embroidery stitches used in this woven rose heart embroidery pattern. This video is great if you’re new to embroidery or just want to see how I stitch each one step by step.
The stitches used in this pattern are stem stitch, raised closed herringbone stitch, woven rose stitch, and French knots. Each one adds something different to the design. The stem stitch makes the stems while, the raised closed herringbone stitch adds texture to the leaves. The woven rose stitch makes the full, layered flowers, and the French knots add tiny details that look like baby’s breath.
These stitches work together to make a balanced and textured piece. Even if you already know them, the video might give you a few new tips or ideas.
Download the Woven Rose Heart Embroidery Pattern

If you want to explore this pattern further, you can download the PDF using the link. I designed it in Procreate on my iPad, which makes it easy to draw and adjust before turning it into a printable design.
The PDF lets you print the pattern and trace it directly onto your fabric. You can use it for personal projects, gifts, or wall décor. It’s meant to be relaxing and enjoyable, whether you finish it in one day or work on it little by little.
DMC Floss Colors Used
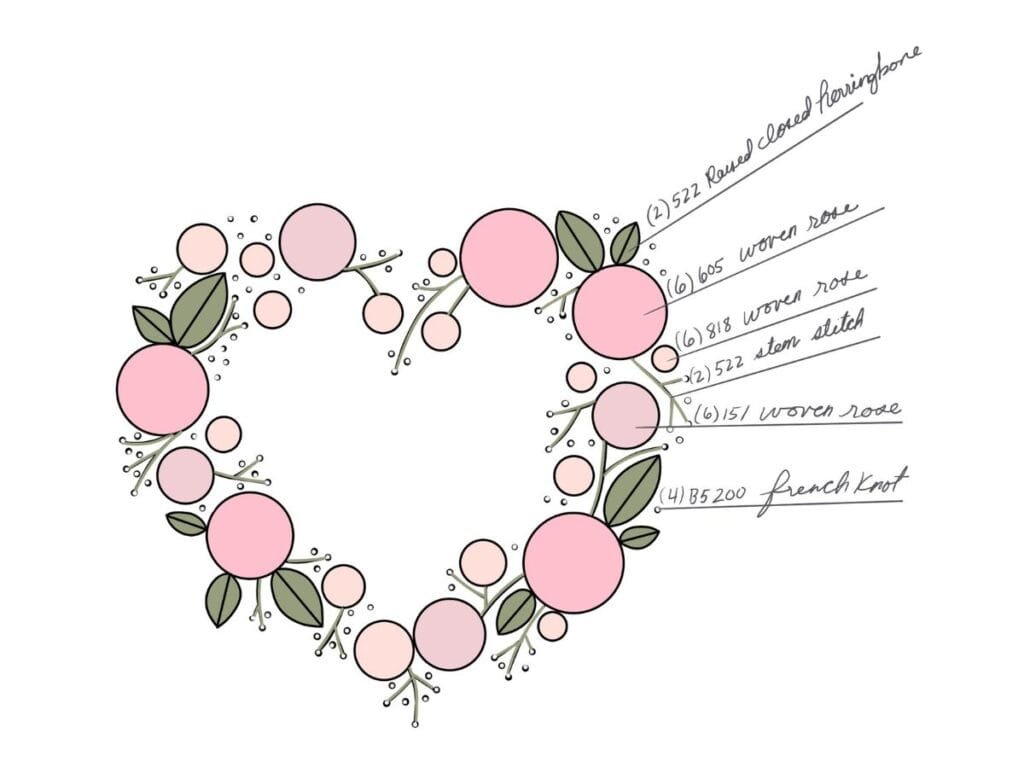
For this woven rose heart embroidery pattern, I picked a soft and romantic color palette that highlights the woven texture while keeping the design light and balanced. The floss colors I used are DMC 522 (Fern Green), 605 (Very Light Cranberry), 818 (Baby Pink), 151 (Very Light Dusty Rose), and B5200 (Snow White).
Together, these colors create gentle contrast and a calm, vintage-inspired look. The baby pink and dusty rose threads make the roses feel delicate and airy. The very light cranberry adds a soft warmth that blends all the colors smoothly. Fern green brings a natural touch that grounds the floral design.
Snow White (B5200) is used for French knots. This bright white helps define the heart shape and makes the softer colors stand out. Using this mix of light and mid-tone shades lets each woven rose look full and dimensional without overpowering the design.
I chose these colors to feel peaceful and welcoming while still giving enough contrast to see all the stitches clearly. This combination works well for wall décor, handmade gifts, or keepsake projects. It adds a romantic, handmade touch to any finished display.
Tracing the Woven Rose Heart Embroidery Pattern and Fabric Choice

For this project, I used two pieces of cotton quilter’s fabric in a neutral beige-yellow color. I put the wrong side of the fabric facing forward, which gave the embroidery a softer, more muted look. Lately, I’ve been enjoying using the opposite side of quilting fabric because it gives a kind of watercolor-style background effect.
This is also a great way to use fabric you might not normally choose for embroidery. Turning the fabric over can change how it looks and help you experiment with colors and textures.
For tracing the pattern, I use friction erasable pens. These make it easy to see the pattern while stitching, and you can remove the marks later with heat. They help keep the lines clean and simple to follow.
Using simple materials and working with what you have makes embroidery feel calm and enjoyable from start to finish. If you need to freshen up your supplies, I’ve also shared some of my favorites on my stitching supplies page.